Paytm Payment Gateway Integration Using PHP
Integrate Payments with Paytm
Add Paytm Payment Gateway to your mobile app or website. Collect online payments from your customers using UPI, Debit/Credit Cards, 50+ NetBanking options and Paytm Wallet.
Are you trying to find payment resolution for your website?
Paytm payment gateway will be a right selection for that.
You can firmly settle for payment mistreatment with Paytm on-line payment.
Paytm is simpler because it is joined with several services that create the web transaction convenient for the customers.
This is one in every of the safest and secured payment gateways in Asian country for on-line dealing.
So here during this tutorial you may learn the way to integrate Paytm payment entryway mistreatment PHP.
So currently we are going to cover up Paytm payment integration with PHP in simple steps:
Step 1: Download Paytm Payment Gateway PHP Kit
First you would like to download Paytm Payment gateway PHP Kit from given link.
You need to copy PaytmKit folder in document root of your server.
PAYTM IS A PAYMENT PROCESS SYSTEM, I WILL INTEGRATE PAYTM WITH WEBSITES BY USING WITH PHP
Just follow below steps:
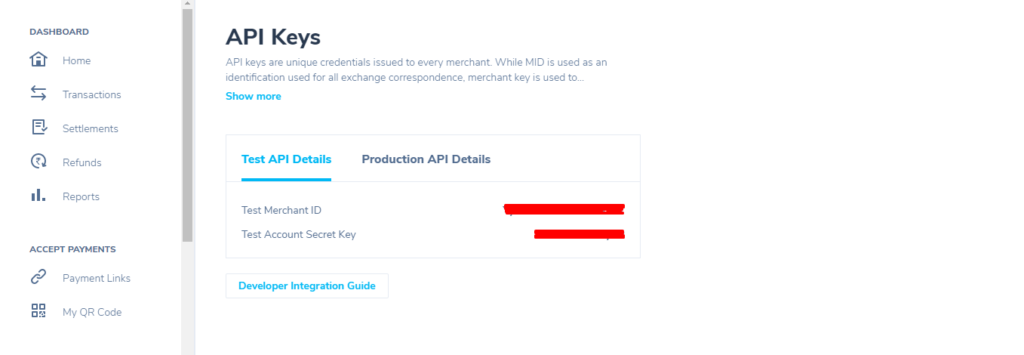
Step2: First, we need to create an account at https://business.paytm.com/ and get our merchant ID and Secret Key.
Now we can start coding in our site to use the Paytm. First, we will configure the Paytm with test credentials to test our code.
Step 3. (filename – config.php)
<?php
/*– Use PAYTM_ENVIRONMENT as ‘PROD’ if you wanted to do transaction in production environment else ‘TEST’ for doing transaction in testing environment.
– Change the value of PAYTM_MERCHANT_KEY constant with details received from Paytm.
– Change the value of PAYTM_MERCHANT_MID constant with details received from Paytm.
– Change the value of PAYTM_MERCHANT_WEBSITE constant with details received from Paytm.
– Above details will be different for testing and production environment.*/
define(‘PAYTM_ENVIRONMENT’, ‘TEST’); // PROD
define(‘PAYTM_MERCHANT_KEY’, ‘**********’); //Change this constant’s value with Merchant key downloaded from portal
define(‘PAYTM_MERCHANT_MID’, ‘**********’); //Change this constant’s value with MID (Merchant ID) received from Paytm
define(‘PAYTM_MERCHANT_WEBSITE’, ‘**********’); //Change this constant’s value with Website name received from Paytm/*$PAYTM_DOMAIN = “pguat.paytm.com”;
if (PAYTM_ENVIRONMENT == ‘PROD’) {
$PAYTM_DOMAIN = ‘secure.paytm.in’;
}define(‘PAYTM_REFUND_URL’, ‘https://’.$PAYTM_DOMAIN.’/oltp/HANDLER_INTERNAL/REFUND’);
define(‘PAYTM_STATUS_QUERY_URL’, ‘https://’.$PAYTM_DOMAIN.’/oltp/HANDLER_INTERNAL/TXNSTATUS’);
define(‘PAYTM_STATUS_QUERY_NEW_URL’, ‘https://’.$PAYTM_DOMAIN.’/oltp/HANDLER_INTERNAL/getTxnStatus’);
define(‘PAYTM_TXN_URL’, ‘https://’.$PAYTM_DOMAIN.’/oltp-web/processTransaction’);*/$PAYTM_STATUS_QUERY_NEW_URL=’https://securegw-stage.paytm.in/merchant-status/getTxnStatus’;
$PAYTM_TXN_URL=’https://securegw-stage.paytm.in/theia/processTransaction’;
if (PAYTM_ENVIRONMENT == ‘PROD’) {
$PAYTM_STATUS_QUERY_NEW_URL=’https://securegw.paytm.in/merchant-status/getTxnStatus’;
$PAYTM_TXN_URL=’https://securegw.paytm.in/theia/processTransaction’;
}
define(‘PAYTM_REFUND_URL’, ”);
define(‘PAYTM_STATUS_QUERY_URL’, $PAYTM_STATUS_QUERY_NEW_URL);
define(‘PAYTM_STATUS_QUERY_NEW_URL’, $PAYTM_STATUS_QUERY_NEW_URL);
define(‘PAYTM_TXN_URL’, $PAYTM_TXN_URL);?>
Step 4. Now we will create a new file(index.php) to create the payment form which will have the amount to be paid and other needed information –
<?php
header(“Pragma: no-cache”);
header(“Cache-Control: no-cache”);
header(“Expires: 0″);
include(‘header.php’);
include(‘container.php’);
?>
<div class=”container”>
<h2>Example: Paytm Payment Gateway Integration in PHP</h2>
<br>
<br>
<form method=”post” action=”pgRedirect.php”>
<table border=”1″>
<tbody>
<tr>
<th>S.No</th>
<th>Label</th>
<th>Value</th>
</tr>
<tr>
<td>1</td>
<td><label>ORDER_ID::*</label></td>
<td><input id=”ORDER_ID” tabindex=”1″ maxlength=”20″ size=”20″
name=”ORDER_ID” autocomplete=”off”
value=”<?php echo “ORDS” . rand(10000,99999999)?>”>
</td>
</tr>
<tr>
<td>2</td>
<td><label>CUSTID ::*</label></td>
<td><input id=”CUST_ID” tabindex=”2″ maxlength=”12″ size=”12″ name=”CUST_ID” autocomplete=”off” value=”CUST001″></td>
</tr>
<tr>
<td>3</td>
<td><label>INDUSTRY_TYPE_ID ::*</label></td>
<td><input id=”INDUSTRY_TYPE_ID” tabindex=”4″ maxlength=”12″ size=”12″ name=”INDUSTRY_TYPE_ID” autocomplete=”off” value=”Retail”></td>
</tr>
<tr>
<td>4</td>
<td><label>Channel ::*</label></td>
<td><input id=”CHANNEL_ID” tabindex=”4″ maxlength=”12″
size=”12″ name=”CHANNEL_ID” autocomplete=”off” value=”WEB”>
</td>
</tr>
<tr>
<td>5</td>
<td><label>txnAmount*</label></td>
<td><input title=”TXN_AMOUNT” tabindex=”10″
type=”text” name=”TXN_AMOUNT”
value=”1″>
</td>
</tr>
<tr>
<td></td>
<td></td>
<td><input value=”CheckOut” type=”submit” onclick=””></td>
</tr>
</tbody>
</table>
* – Mandatory Fields
</form></div>
<?php include(‘footer.php’);?>
Step 5. Here in form, we have set the action=”Redirect.php”, so we will create a new file with this name
<?php
header(“Pragma: no-cache”);
header(“Cache-Control: no-cache”);
header(“Expires: 0”);
// following files need to be included
require_once(“./lib/config_paytm.php”);
require_once(“./lib/encdec_paytm.php”);$checkSum = “”;
$paramList = array();$ORDER_ID = $_POST[“ORDER_ID”];
$CUST_ID = $_POST[“CUST_ID”];
$INDUSTRY_TYPE_ID = $_POST[“INDUSTRY_TYPE_ID”];
$CHANNEL_ID = $_POST[“CHANNEL_ID”];
$TXN_AMOUNT = $_POST[“TXN_AMOUNT”];// Create an array having all required parameters for creating checksum.
$paramList[“MID”] = PAYTM_MERCHANT_MID;
$paramList[“ORDER_ID”] = $ORDER_ID;
$paramList[“CUST_ID”] = $CUST_ID;
$paramList[“INDUSTRY_TYPE_ID”] = $INDUSTRY_TYPE_ID;
$paramList[“CHANNEL_ID”] = $CHANNEL_ID;
$paramList[“TXN_AMOUNT”] = $TXN_AMOUNT;
$paramList[“WEBSITE”] = PAYTM_MERCHANT_WEBSITE;$paramList[“CALLBACK_URL”] = “http://phpzag.com/demo/paytm-payment-gateway-integration-in-php/pgResponse.php”;
$paramList[“MSISDN”] = 7777777777; //Mobile number of customer
$paramList[“EMAIL”] = “[email protected]”; //Email ID of customer
$paramList[“VERIFIED_BY”] = “EMAIL”; //
$paramList[“IS_USER_VERIFIED”] = “YES”; //
//Here checksum string will return by getChecksumFromArray() function.
$checkSum = getChecksumFromArray($paramList,PAYTM_MERCHANT_KEY);?>
<html>
<head>
<title>Merchant Check Out Page</title>
</head>
<body>
<center><h1>Please do not refresh this page…</h1></center>
<form method=”post” action=”<?php echo PAYTM_TXN_URL ?>” name=”f1″>
<table border=”1″>
<tbody>
<?php
foreach($paramList as $name => $value) {
echo ‘<input type=”hidden” name=”‘ . $name .’” value=”‘ . $value . ‘”>’;
}
?>
<input type=”hidden” name=”CHECKSUMHASH” value=”<?php echo $checkSum ?>”>
</tbody>
</table>
<script type=”text/javascript”>
document.f1.submit();
</script>
</form>
</body>
</html>
To handle the response of return call from paytm we need another file(Response.php)
<?php
require_once(“config.php”);
require_once(“encdec_paytm.php”);
$paytmChecksum = “”;
$paramList = array();
$isValidChecksum = “FALSE”;
$paramList = $_POST;
$paytmChecksum = isset($_POST[“CHECKSUMHASH”]) ? $_POST[“CHECKSUMHASH”] : “”; //Sent by Paytm pg